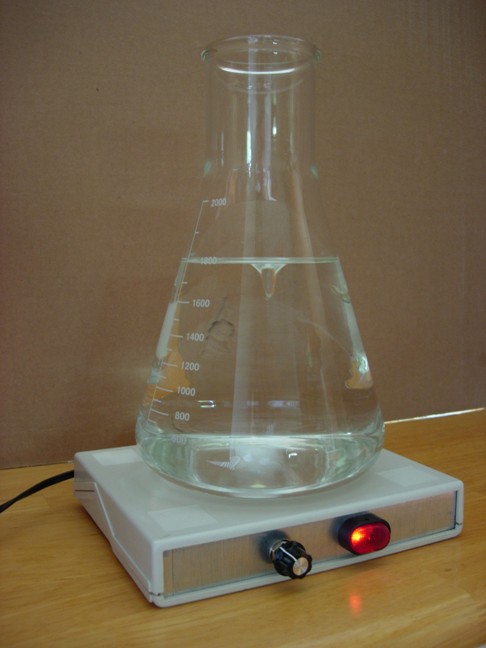
Basic stirplate for yeast suspension
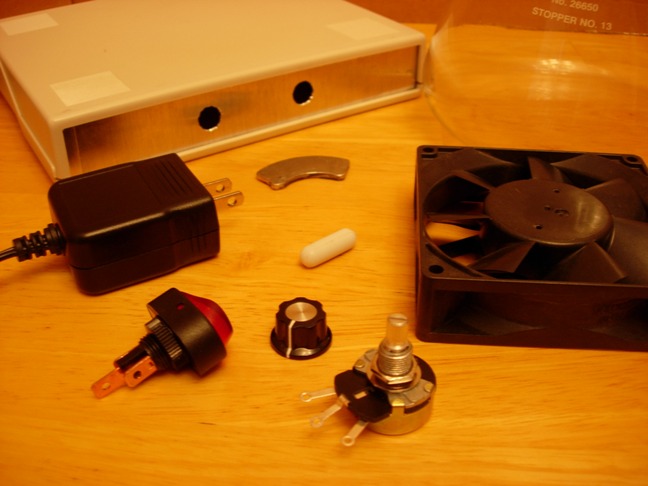
Materials
1 box (sizes nearly unlimited)
1 computer fan 12v
1 dc power supply 6v
1 rare earth magnet
1 rheostat (pot) 25ohm 3watt
1 power toggle switch (optional)
 |
 |
 |
 |
Computer fans are cheap. Failing computers are a great source of fans, either in the power supply or case (read: FREE). If not, these fans are available at any computer parts store for $5 to $10. Get a 12v fan that is roughly 4” x 4”.
DC power supplies are usually abundant. Anyone who has gone through several cell phones, digital cameras, and other small electronics probably has a drawer somewhere full of unused power supplies, so ask around (again read: FREE). Otherwise, your friendly neighborhood Radio Shack should have them for a few dollars. A 6V DC power supply is what you’re after, though a 9V or 12V would work with fiddling.
Rare earth magnets can be harvested from dead computer hard drives. All you need to do is open the hard drive case and remove the magnet from the read/write head (again, read: FREE). I've gotten a lot questions about just how to get these magnets out of the hard drive, so I created a separate instruction page for harvesting magnets here. Alternatively, you can find rare earth magnets at most electronic stores or online at McMaster.
Rheostat's can be found at electronic shops. Radio shack has the 25ohm 3watt variety cheap. Sometimes you can find them at Fry’s, electronic stores, or online at P3America.
Toggle switches are a few bucks and available at Radio Shack. They aren’t necessary but are convenient. I like to have my stir plate plugged in and then power it on/off with a switch. Though you can save yourself some effort here and control power by simply plugging/unplugging the power supply from the wall outlet.
Rheostat Tip
The computer fan spins so fast that you really only need 10-20% of its power. Spinning much faster than that will spin the magnets so fast that excessive turbulence is created inside the flask (suspending the yeast is one thing, making them pull 5 G’s is another). The 25ohm pot provides enough resistance to get the fan spinning at its fastest potential, will its minimum speed being just about right for yeast suspension. The combination of 12v fan and 25ohm rheostat seems to be a good one for both 1 liter and 2 liter flasks, though nearly any combination could work with some tweaking. If a 9v or 12v power adaper is used, you can employ a fixed resistor or second rheostat to add resistance and slow the fan down. One of my stirplates uses two pots, one as a master to set the the general speed of the fan (this sits entirely on the inside of the box). The second pot is the fine control which is mounted to the box wall with the control knob on the outside. I am not an authority when it comes to electricity. In fact, it took several whiteboard sessions from a buddy to explain this to me. So if my rude descriptions aren’t good enough you can do some Googling for Ohm's Law. This can get a little confusing if you're not already familiar with it, and personally once they started putting letters in math I never did so well. Instead of using two pots there’s always the option of using an inline fixed resistor in place of the master pot, but with the variable resistance of a second pot you get a little wiggle room. This wiggle room is particularly helpful if electrical theory is not your strong suit.
Assembly
I don’t think I can describe the wiring in way that would be detailed enough to be helpful. So the following is a very general description. Splice your fan’s power cable and connect it to the cable of the 6v DC power supply. I soldered my connection and covered with shrink wrap, but wire nuts and/or electrical tape would probably suffice. The toggle switch and pots will also need to connect into the power line (if you use two pots, just put a short jumper cable between the pots for power and ground). Setting all the components in place and making your best guess would work fine. If the system doesn’t work, switch something around. If you’re handy with an ohmmeter, you can save yourself some time. Or like me, find someone who is skilled in this area and promise them some homebrew if they lend a hand.
Use
I’ve followed the advice of Jamil Z from Mr Malty. Jamil gives an incredibly informed and detailed explanation of yeast, starters, and pitching on his site. I make a batch of wort two days before my brew day. I cover with a hepifilter from MoreBeer, but plain old foil will do. After the wort has cooled, yeast is pitched and aerated (I use an O2 stone) I put the flask on the stirplate and spin for 48 hours. Generally speaking, a properly prepared starter can increase yeast cell counts from 100 billion to 240 billion in two days.