Recirculation Arm
As I've mentioned I was unhappy with my previous recirculation arm. For a long time I step mashed with low heat and constant stirring - can you say sore arms? Then when it came time to vorlauf, I would have to vorlauf into a pitcher and pour back into the mash. I didn't like standing there with a pitcher that filled with wort at and excrutiatingly slow pace, and pouring the wort back into the mash opens up the possibility of hot side aeration. Introducing a recirculation arm has saved me lot of time stirring the mash. By constantly cycling the wort through the grainbed while direct heating I assure myself of no scorching, eliminating the need to stir during step mash heating. Vorlauf works the same way, only without heat, so no more pitchers!
My biggest challenge was making the ring height adjustable. I usually do 5 gallon batches, but occasionally do 10 gallons, and my average 5 gallon grain bill runs between 10 and 17 pounds making mash volume quite variable. I wanted the sparge ring to sit right on top of (or right below) the wort level in the mash tun. To do this I have a horizontal arm through the vessel wall, and attach a small piece of silicone tube to get the right height. I keep three pieces of various length tubing that gives me really good adjustable height options. Short lengths of silicone tubing are cheap (sometime even free), making this a pretty cost effective way have a height adjustable ring.
The Parts
- Copper pipe 3/8"(enough for a ring, arm, and supports)
- 3 copper tees 3/8"
- 1 copper 90 degree elbow 3/8"
- 1 copper tube joiner 3/8"
- 1 compression fitting 5/8"
- 1 5/8" to 1/2" adapter (male to male)
- 1 1/2" pipe thread to 3/4" hose thread adapter (female to male)
- 2 3/4" hose thread to 1/2" pipe thread (female to female)
- 1 1/2" pipe thread hex coupler
- Brass quick disconnects
- Ball valve
- 90 degree brass elbow 1/2" (female to male)
- Silicone tubing 1/2"
 |
 |
 |
 |
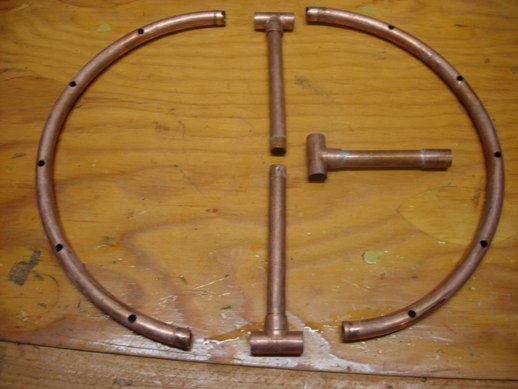
The Ring
This is the easiest part. Form a ring out of your copper tubing, drill holes, then split into two halves. Connect the halves with copper tees, and connect those copper tees with two straight tubes into a copper tee pointing up. Attach another straight tube into the center tee vertically, and put a tube joiner on the end of this tube. (The tube joiner has a slightly larger outside diameter, which holds the 1/2" tube better.
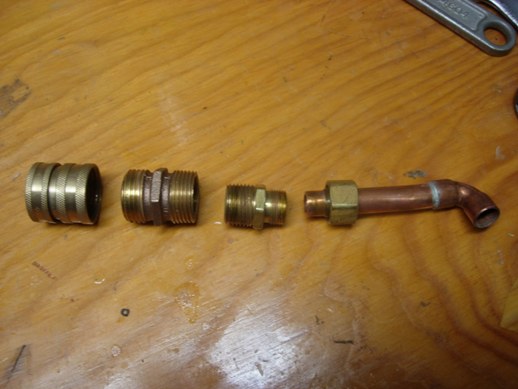
The Arm
The arm assembly was somewhat of a plumber's nightmare. Use your compression fitting on a straight copper tube with a 90 degree elbow on the other end. On the compression fitting side, attach the compression fitting to 5/8" adapter which connects to the hose thread adapter which attaches to the quick disconnect. The beauty of this recirculation arm is that it's attached via quick disconnects, which makes it easy to remove and stir when needed.
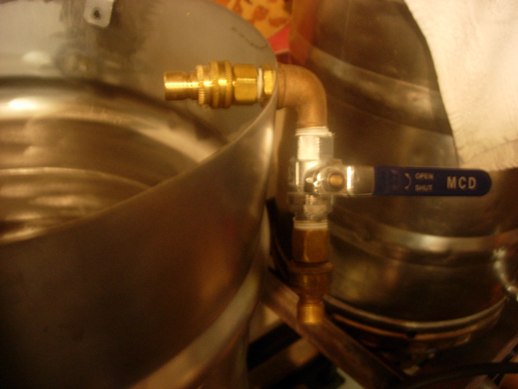
The Arm Attachment
Drill a hole through your mash tun wall and insert the pipe thread hex hex coupler. On the inside attach a hose thread adapter and male quick disconnect. On the outside attach the 90 degree elbow to the ball valve to the hose thread adapter to the male quick disconnect.
Recirculation Arm Use
I always leave the arm attachment on the mash tun. When ever I need to connect the recirculation arm, it's as simple as a speed quick disconnect. I gauge the mash level and select a piece of silicone tubing (maybe 2") to connect the ring to the arm vertically. The ring should sit just under the wort level (or right on top). Now all I have to do is turn on the pump and the wort will reciculate through the mash. No more stirring while direct heat step mashing, and now more pitchers to vorlauf.
This set up works perfectly as a continuous fly sparge ring. I believe it would also work as a mash recirculation ring on RIMS setup. Finally a word on soldering. I soldered any of the copper tubes that were vertical to keep them from falling. Right now, everything else seems to be holding with a friction fit. If I find any leaks or tubes popping out of tees, I'll go ahead and solder the remaining joints.